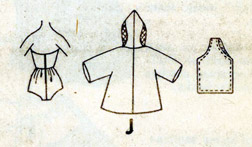
Barbie is ready to go to the beach today. This is a different bathing suit than the first one I posted (Barbie’s Bathing Suit). This one is also made of woven fabric as it is from a vintage pattern 1963. The bathing suit is more like a little play suit in comparison to the slick lycra/spandex suits we now wear!

![]()
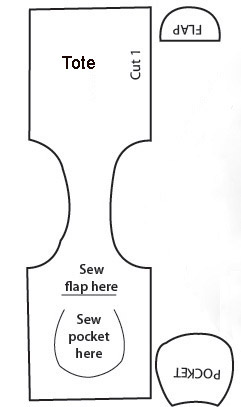
The tote is the same as for the Barbie’s Coat and Purse
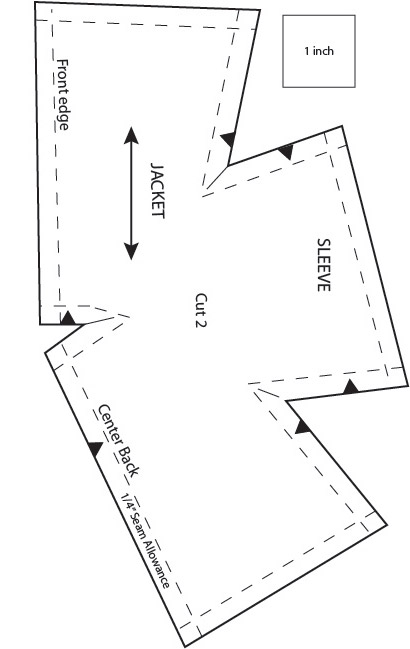
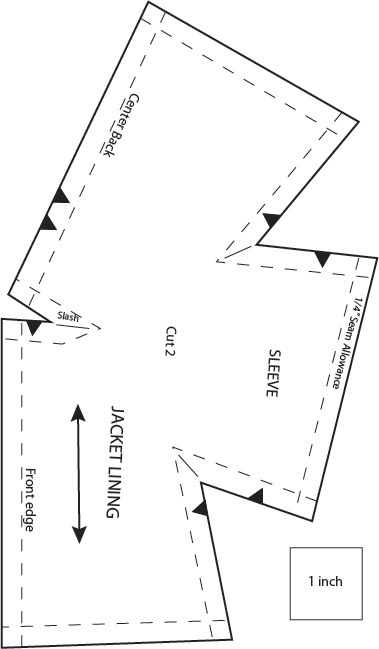
There are five pattern pieces to print. Remember to print so that your printer does not resize (print Actual Size or similar).


Instructions for saving and printing jpg or pdf files are here.
Download pdf file of Barbie’s Bathing Suit, Coverup, and Tote
Instructions for Sewing Bathing Suit, Coverup (Jacket), and Beach Tote
BATHING SUIT
*The bathing suit is made of woven fabric (1963).
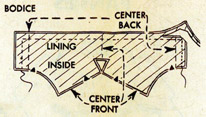
1. BODICE Line bodice, RIGHT SIDES TOGETHER, matching centers. Stitch along upper and back edges. Trim seams, trimming away corners:
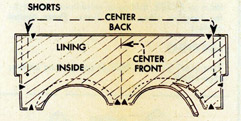
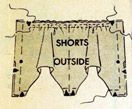
2. SHORTS Line shorts in same manner. Stitch leg and back extension edges above circles. Trim seams, clip along curves:
CENTER FRONT SEAM, DART SEAM, GATHERS
3. Turn bodice and shorts right side out, press. Baste together along raw edges and dart lines. Join seam, RIGHT SIDES TOGETHER, stitching through all thicknesses. Press seam open.
Join dart seam on lining side, folding on solid lines and stitching together along dotted lines. Trim to 1/8″ from stitching:
4. Gather along upper edge of shorts along lines indicated:
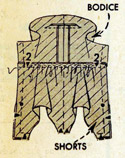
JOINING BODICE TO SHORTS
5. Join seam at waist, RIGHT SIDES TOGETHER, matching centers and adjusting gathers evenly. Press seam toward bodice:
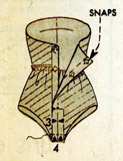
6. Join center back seam to circle; clip left seam edge to circle. Join crotch seam matching centers. BACK CLOSING Turn under right back edge on center line. Lap backs, matching centers; fasten with 2 snaps:
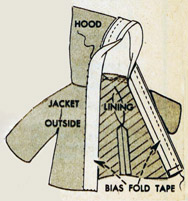
JACKET
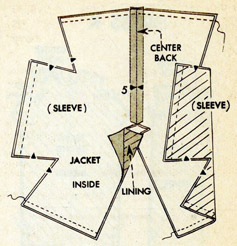
7. Join center back seams for cover-up and also for lining.
Pin lining to cover-up, RIGHT SIDES TOGETHER, matching center back seams, outer edges even. Stitch un-notched lower edges of jacket and sleeve sections as shown. Trim seams:
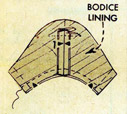
8. Turn jacket right side out , press; baste raw edges together. Stitch neck edge along seam line; then slash to circle as indicated:
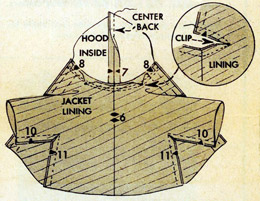
HOOD
9. Join center back seam; press open.
Join hood to neck edge of jacket, RIGHT SIDES TOGETHER, matching center back seams and circles. Stitch again just outside seam; press seam toward hood.
UNDERARM SEAMS
Join entire underarm seams in jacket and sleeves, clop at inner corner on line indicated.
BIAS TAPE TRIM
Open out one edge of bias tape. Stitch to front edges of jacket and hood in 1/4″ seam, right side of tape against lining and INSIDE of hood, turning in ends of tape. Trim seam.
Turn tape to OUTSIDE, press. Slipstitch free edge and ends flat to position:
TOTE BAG
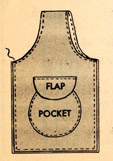
10. Edge-stitch curved handle edges of bag. Stitch POCKET, then FLAP to purse along lines indicated:
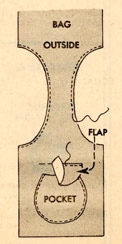
11. Fold purse, WRONG SIDES TOGETHER , edges even; stitch sides and bottom close to edges: