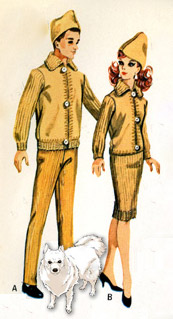
For Ken a jacket with knit trim, hat, and trousers.
![]()

Two pages for these patterns
Instructions for saving and printing jpg or pdf files are here.
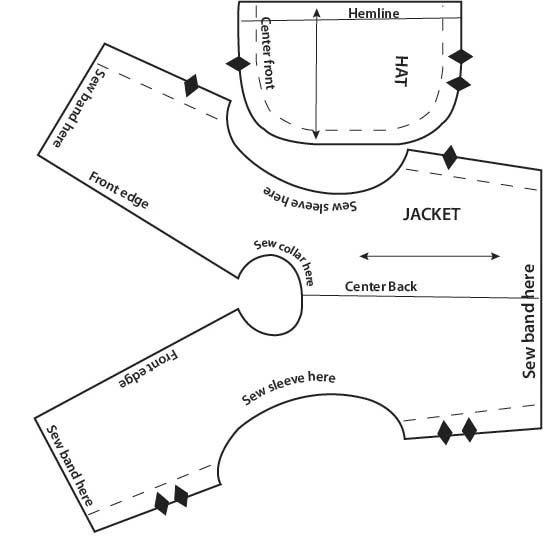
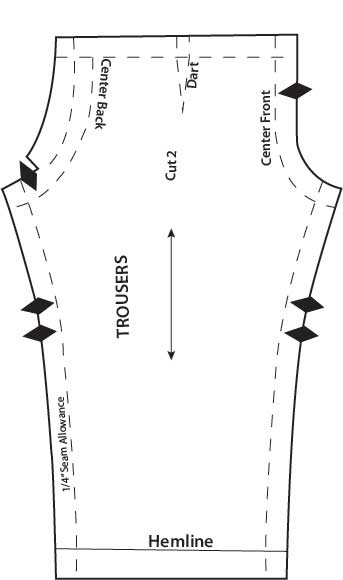
Pdf file of Ken’s Jacket Body and Hat and Ken’s Trousers
Instructions for Sewing (and Knitting) Ken’s Jacket, Hat, Trousers, and Socks
Make the jacket body of chamois, felt, or fur cloth. Something that won’t ravel. The trousers and hat can be made of denim, cotton chambray, light weight wool, flannel, etc.
1. TROUSERS Sew darts with RIGHT sides together. Press towards center front seam. Sew center front seam; clip along curve; press open.
Turn under seam allowance on upper and back extension edges above circles, clipping along curves; edge-stitch.
LOWER HEMS Turn under hemlines, stitch 1/4″ from turned edges:
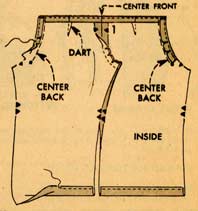
2. SEAM Join center back seam below circle; clip LEFT seam edge to circle; press seam open, clipping along curve. Join inner leg seam matching center seams and making lower edges even:
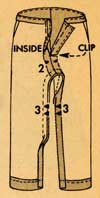
3. FINISHING Turn under RIGHT back opening edge on center line, press. Lap backs matching centers; fasten with snap:

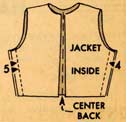
4. JACKET join underarm seams; press open:
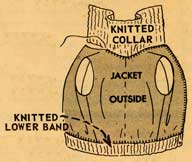
5. KNITTED COLLAR, SLEEVES, AND LOWER BAND Follow KNITTING INSTRUCTIONS under Part 2 continued for attaching collar:
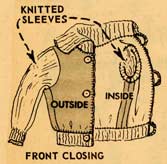
6. Attach sleeves and lower band as described in KNITTING INSTRUCTIONS same as above. The front edges are finished in the blanket stitch.
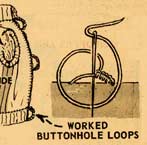
FRONT CLOSING Using some 3-ply yarn as for knitting, work 3 loops on RIGHT front as shown; sew 3 small buttons opposite loops:
7. WORKED BUTTONHOLE LOOPS
Work buttonhole stitches over single strand loops long enough to fit over buttons:
8. HAT Sew crown seam, trim and press open. Turn under hemline on lower edge and slip stitch in position:

Knitting Instructions for Ken’s Jacket Collar, Sleeves, and Lower Band
SUPPLIES:
3-ply fingering yarn (1 oz will complete Views A and B)
Needles: Set of 2 No. 2 knitting needles
No. 1 steel crochet hook
Embroidery needle
COLLAR:
With No. 2 needles, cast on 25 sts.
Row 1 (right side): k 1, *p 1, k 1, repeat from * across row.
Row 2: p 1, *k 1, p 1, repeat from * across row.
Repeat these two rows for 12 rows. Bind off loosely in ribbing.
LOWER BAND:
Cast on 31 sts and work in ribbing as for collar for 6 rows. Bind off in ribbing.
Place band against lower edge of jacket, right sides up, so that cast-on row if knitting meets cut edges and pin, stretching band to fit (fig 13) 088
Join edges tog in blanket st, using and embroidery needle and matching yarn (doubled), taking sts 1/8″ deep and 1/8″ apart into material for jacket and into cast on row. Stretch band to fit flat while joining (see fig 13 above and also the sewing instructions for Ken’s Jacket).
ATTACHING COLLAR:
Continue working blanket sts up one edge of front to neck edge and join collar to neck edge in same manner as band. Then continue working blanket sts down the remaining front edge and fasten off. With crochet hook, beg at lower corner of band, work a row of sc (single crochet) up the front, around the collar and down to opposite corner, taking sts into each knitted or blanket st.
SLEEVES:
Beg at top of sleeve, cast on 18 sts loosely. Work in stockinette st (k 1 row, p 1 row) for 3 inches, ending with a p row. Next Row: *k 1, k 2 tog, repeat from * across. P 1 row. Then work in ribbing of k 1, p 1 for 1/2″ (cuff). Bind off in ribbing leaving enough yarn to overcast sleeve seam and join to armhole. Sew sleeve seams tog. Sew sleeves into jacket armhole, matching seams, using overcast sts on wrong side.
WORKED BUTTONHOLE LOOPS:
See sewing instructions for assembling and finishing details.
Knitting Instructions for Ken’s Socks
SUPPLIES:
3-ply fingering yarn
1 set of 4 No. 0 dp knitting needles
1 set of 4 No. 2 dp knitting needles
Embroidery needle
BEGIN
On 3 No.0 needles, cast on 14 sts loosely (5, 5, 4). Join, work in ribbing of k 1, p 1 for 4 rnds.
Change to No. 2 needles. Work in stockinette st (k each rnd) until piece is 2-1/2″ long. Divide sts in half on 2 needles for heel and instep.
HEEL:
On one needle only, work back and forth in stockinette st (k 1 row, p 1 row) for 5 rows, ending on k row. TURN HEEL: P forst 4 sts, p 2 tog, turn; k 2, k 2 tog, turn; p 2 p last sts tog, turn; k 2, k last 2 sts tog – – 3 sts left on heel needle. Do not turn.
GUSSETS:
From k side, with heel needle, pick up and k 3 sts on side of heel; with 2nd needle, k the 7 instep sts; with a 3rd needle, pick up and k 3 sts on other side of heel and k 1 from heel needle. Mark last st for end of rnd. SHAPE SIDES OF GUSSETS – – RND 1: On first needle, k3, k 2 tog; on 2nd needle, k instep sts; on 3rd needle, k 2 tog, k 2. RND 2: On first needle, k 2, k 2 tog; k instep sts; on 3rd needle, k 2 tog, k 1. RND 3: On first needle, k 1, k 2 tog, k to end of rnd – – 11 sts remain on rnd. *K around for 12 rnds. Break yarn, leaving enough yarn to gather all sts from knitting needles with large-eyed embroidery needle. Pull sts tightly tog and fasten.
*NOTE: For Proper Fit
If doll’s feet measure 1-3/8″, follow above instructions. If feet measure less, drop off 1 rnd per 1/8″/ Example: 1″ foot – makes 9 rnds instead of 12.